[Previous] [Contents] [Next]
 [Comments or questions]
Copyright © 1996-2001 jsd
16
Flight Maneuvers
-
-
- A small correction early is better
than a large correction late.
— Aviation proverb
16.1
Fundamentals
During flight, you have quite a number of tasks and responsibilities:
- You are either accelerating, decelerating, or maintaining constant
speed.
- You are either climbing, descending, or maintaining constant altitude.
- You are either turning left, turning right,
or maintaining constant direction of motion.
- You are either slipping left, slipping right,
or maintaining coordinated flight.
- You have control over the flaps, landing
gear, various engine controls, et cetera.
- You must keep track of where you are, so
you don't miss your destination, run into obstructions, or whatever.
- You need to keep track of weather conditions.
- You must keep watch at all times1 to make sure you see and avoid other aircraft.
- Et cetera.
The first three items on this list are what I call the ``fundamentals''
of maneuvering.2 Simple maneuvers (including plain old straight
and level flight) and even some quite complex maneuvers can be broken down
into combinations of these three fundamental tasks. Of course, while you
are maneuvering you still remain responsible for all the other items on
the list.
Some of the maneuvers in this chapter are important parts of everyday flying.
For instance, final approach requires lining
up on a ``front window'' ground reference. Flying the downwind leg of the
airport traffic pattern requires paralleling a ``side window'' ground reference.
Oftentimes you or your passengers want to get a good view of some landmark,
which requires turning around a point. If there is some wind (as there almost
always is) you will need to correct for it.
The other maneuvers in this chapter, even though they are not directly practical,
serve important pedagogical purposes. Chandelles
and lazy eights are
good illustrations of several of the points made in this book, including
(a) the importance of angle of attack, (b) the relationship between angle
of attack and pitch attitude, and (c) the behavior of the plane when its
airspeed doesn't equal its trim speed. Some of these maneuvers may seem
daunting at first, because they require doing several things at once. Fortunately,
though, the ingredients are not particularly hard and can be learned separately.
16.2
Accelerating and Decelerating
This is a very important maneuver which has not always been sufficiently
stressed during pilot training. The idea is to change speed while maintaining
constant altitude, constant heading, et cetera.
Start from, say, cruise speed. Decelerate to VY.
When you reach the new speed, set the engine controls and trim so that the
plane will maintain that speed. After you have flown in this configuration
long enough to convince yourself that everything is stable, decelerate to
a speed well below VY (but with
a reasonable margin above the stall). Again, stabilize the plane at the new
speed. Then accelerate back to VY
and stabilize. Then accelerate to cruise and stabilize. Iterate this a few
times until you are sure you've got the hang of it.
You will have an easier time understanding how to use the throttle (especially
at speeds below VY) if you keep
in mind the concepts of kinetic energy
and power curve. These are discussed
at length in section
7.2.
You will also want to keep in mind the relationship between trim and airspeed,
as discussed in section
2.6.
An interesting variation of this maneuver is to practice accelerating and
decelerating with the flaps extended. (Make sure you observe the speed limit for flaps-extended operations, which is typically
quite a bit lower than for flaps-retracted operations.) This is interesting
because on some planes, adding power with flaps extended causes a huge nose-up
trim change; you will need to roll in some nose-down trim to compensate.
16.3
Phugoids
In flight it is fairly common for the airplane to find itself at an airspeed
rather different from its trim speed. This situation will result in a phugoid
oscillation, as discussed in section
6.1.12. It is definitely worth seeing this behavior for yourself.
Start with an airspeed, say, halfway between VY
and cruise. Pull back on the yoke until the airplane slows down about ten
knots, and then let go. As discussed in section
6.1.12, the airplane tries ``too hard'' to return to its original airspeed,
altitude, and attitude; it will overshoot and oscillate for several cycles.
From time to time during this maneuver, look at the airspeed indicator and
altimeter. This will provide a good illustration of the law of the roller
coaster (9 feet per knots, per hundred knots).
See section
1.2.1. This maneuver is also a good illustration of the principle of
angle of attack stability, as discussed in chapter
6.
Practice ``catching'' the phugoid at various points in the cycle. That is,
by pushing or pulling on the yoke, maintain constant altitude until the airspeed
returns to normal. It is particularly interesting to catch it right when
the airspeed equals the trim speed. By returning it to normal attitude at
that moment, you can instantly end the oscillations.
If you use the wrong procedure (pushing on the yoke when the altitude is
highest and pulling on the yoke when the altitude is lowest) you will just
make the situation worse. This an example of a pilot-induced oscillation
(PIO). It is more common than you might think, and can cause serious trouble
if it happens near the ground, as discussed in connection with evil zooms in section
12.11.8 and section
16.17.6.
16.4
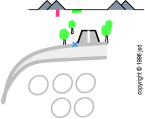
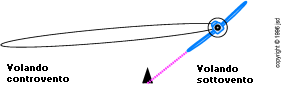
Crabbing Along a Road
One of the most basic maneuvers involves choosing a ground reference such
as a long, straight road and flying along it. The point of the maneuver
is to practice perceiving and correcting for crosswinds,
so choose the road so that there is a significant crosswind component.
Actually, correcting for the crosswind is the easy part. If the plane starts
getting blown off to the left of the road, you will instinctively turn the
plane a little to the right to compensate. The tricky part is to notice
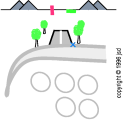
that you have done so. The situation shown in figure
16.1 (crosswind from the left) seems quite normal. Similarly, the situation
shown in figure
16.2 (crosswind from the right) also seems quite normal. It is important
to be able to perceive the difference. The outside world looks the same
in both cases; the difference is that the alignment of the airplane has
changed relative to the outside world.
Figure
16.3 and figure
16.4 show bird's eye views of the same situations.
You should always make a point of noting your direction of flight (which
is aligned with the road in this case) relative to bolts on the cowling,
marks on the windshield,3 and other parts of the airplane.
You should be especially alert to these perceptions during final approach,
since you need information about the wind in order to prepare for a proper
crosswind landing.
It also pays to notice the crosswind during the base leg. If the crosswind
is trying to blow you toward the airport then you will have a tailwind on
final and (most likely)4 a tailwind during landing. You might want to
break off the approach and take a good look at the windsock before trying again.
These perceptions can give you rather precise information about the wind.
The magnitude of the crosswind is proportional to the wind-correction angle
and to your airspeed:
- At 60 knots one degree corresponds to 1 knots of crosswind.
- At 90 knots one degree corresponds to 1.5 knots of crosswind.
- At 120 knots one degree corresponds to 2 knots of crosswind.
 Figure
16.4
Figure
16.4: Crosswind from the Right — Bird's Eye View
16.5
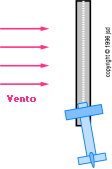
Slipping Along a Road
Another useful maneuver is the following: Make sure you are at a safe airspeed.
Line up on a road with a nice crosswind, as before. Now lower the upwind
wing using the ailerons, and apply opposite rudder (i.e. push the rudder
pedal on the downwind side). The idea is to establish a slip so that the airplane's axis and its direction
of motion are both aligned with the road.
The slip will cause lots of drag. You will have to add power to maintain altitude. For goodness sake don't
pull back on the yoke; you will be at a fairly low altitude (since this
is a ground-reference maneuver) and you really don't want to stall in such
a situation.
Make a note of how much bank angle and how much rudder pressure are needed
for a given amount of crosswind. This varies considerably from one type
of airplane to another. This knowledge comes in handy during crosswind landings;
you don't want to wait until you are in the midst of a landing to figure
it out.
The previous section discussed how to roll into and roll out of turns. Flying
around in an established turn is relatively simple. You might need to deflect
the rudder toward the inside of the turn (to compensate for the long-tail
slip effect) and deflect the ailerons toward the outside of the turn (to
compensate for the overbanking tendency).
If you are turning to intercept a landmark, you need to think a little about
how steep a turn to make and when/where to start
the turn. It so happens that for any particular bankbank attitude angle, the turning radius depends on the square
of your speed. A turn that consumes a tenth of a mile at 60 knots will consume
nearly a mile at 180 knots.
| speed |
rate |
radius |
bank |
load |
| (knots) |
(°/sec) |
(nm) |
(degrees) |
factor |
| 60 |
10.5 |
0.09 |
30 |
1.15 |
| 75 |
8.4 |
0.14 |
30 |
1.15 |
| 90 |
7.0 |
0.20 |
30 |
1.15 |
| 105 |
6.0 |
0.28 |
30 |
1.15 |
| 120 |
5.3 |
0.36 |
30 |
1.15 |
| 135 |
4.7 |
0.46 |
30 |
1.15 |
| 150 |
4.2 |
0.57 |
30 |
1.15 |
| 165 |
3.8 |
0.69 |
30 |
1.15 |
| 180 |
3.5 |
0.82 |
30 |
1.15 |
A standard rate turn is defined to be
three degrees per second. This is what ATC expects
when you're on an instrument clearance. It is also called a two-minute turn,
because at that rate it takes two minutes to make a complete 360° turn. You can see from
the following table that the bank angle required grows in proportion to
the airspeed. Because of the changing bank, the radius of turn grows in
proportion to the airspeed (not the square thereof).
You should figure out the bank angle that corresponds to a standard-rate
turn for the airspeed(s) you normally use.
| speed |
rate |
radius |
bank |
load |
| (knots) |
(°/sec) |
(nm) |
(degrees) |
factor |
| 60 |
3 |
0.32 |
9.4 |
1.01 |
| 75 |
3 |
0.40 |
11.6 |
1.02 |
| 90 |
3 |
0.48 |
13.9 |
1.03 |
| 105 |
3 |
0.56 |
16.1 |
1.04 |
| 120 |
3 |
0.64 |
18.2 |
1.05 |
| 135 |
3 |
0.72 |
20.3 |
1.07 |
| 150 |
3 |
0.80 |
22.4 |
1.08 |
| 165 |
3 |
0.88 |
24.4 |
1.10 |
| 180 |
3 |
0.95 |
26.3 |
1.12 |
16.7
Coordination Exercises
Here is a good maneuver for learning about your plane's roll-axis inertia and adverse yaw, called
``coordinated wing rocking''. The procedure is: roll rather rapidly into
a 45 degree bank to the left. Pause for a moment, then roll to wings level.
Pause again, then roll 45 degrees to the right. Pause again, roll wings
level, and repeat.
Refer to chapter
11 for a discussion of various techniques for perceiving whether or
not your maneuvers are accurately coordinated.
The rolls should be done sufficiently rapidly that significant aileron deflection
is required. Do the maneuver at cruise airspeed, and then do it at approach
speed and even slower speeds, so you can see how the amount of rudder required
increases as the speed decreases. Do the maneuver while looking out the
side (wings should go up and down like a flyswatter, with no slicing) and
while looking out the front (rate of turn proportional
to amount of bank, no backtracking on roll-in,
no overshoot on roll-out). Pay attention to the
seat of your pants.
You should do the maneuver two ways: once with large aileron deflection
applied gradually, and once with large aileron deflection applied suddenly.
The difference between the two demonstrates adverse yaw.
Here is another exercise. Unlike the previous one (which involved coordinated
wing rocking) this one involves intentionally uncoordinated wing rocking.
You bank the airplane but apply top rudder to keep it from turning. This
is grossly uncoordinated, but it is amusing and educational because it lets
you learn the feel of the controls and the response of the airplane. (Do
not get in habit of starting turns in such a way.)
This uncoordinated wing-rocking exercise is related to (but not quite the
same as) the Dutch roll oscillations discussed
in section
10.6.1. Both involve slipping to one side and then the other, like a
Dutch kid on skates, making a series of slips (left, right, left, right)
without much change in heading. The difference is that genuine Dutch roll
oscillations involve a lot of yawing, while in the coordination exercise,
you use the rudder to prevent any yaw. Let's call this the ``3/8ths hesitation
roll'' since it resembles three eighths of an
aerobatic 8-point roll.
Another uncoordinated exercise that is somewhat amusing and educational
is as follows: keeping the wings level at all times, yaw the nose to the
left with the rudder. Then raise the nose with the flippers. Then yaw the
nose to the right with the rudder. Then lower the nose with the flippers,
and repeat. Imagine you are drawing a rectangle on the sky in front of you,
using the axis of the airplane as your pencil. Because of the slip-roll
coupling described in section
9.2, while pressing right rudder you will need to apply left aileron
to keep the wings level. The purpose of this exercise is to illustrate yaw-axis
inertia, yaw-axis stability, and yaw-axis damping.
That is, you will notice that if you make a sudden change in rudder deflection,
the nose will overshoot before settling on it steady-stage heading. (Once
again, the combination of controls used here is very different from proper
turning procedure.)
16.8
Familiarization Exercises; Configuration Changes
Imagine you are not completely familiar with the aircraft you are flying.
You are have just flown an instrument approach,
and have broken out of the clouds about 150 feet above the runway. You are
flying at 100 knots. Within the next 15 seconds or so, you need to slow
down to 71 knots in preparation for landing. Therefore you take the following
actions:
- Pull the throttle to idle
- Extend the flaps the rest of the way
- Deploy the speed brakes5
Now imagine that those actions do not cause the airplane to slow down! You
discover that on this airplane, each of those actions causes a nose-down
trim change. The airplane pitches over and dives toward the ground at high
speed. This is not good.
Therefore, in this airplane, a much better procedure would be to take the
following actions:
- Pull the throttle to idle and apply some nose-up trim to compensate.
- Extend the flaps the rest of the way and apply some more nose-up trim
to compensate.
- Deploy the speed brakes and apply even more nose-up trim to compensate.
- As you decelerate, apply yet more nose-up trim.
For any given airplane, you need to know how much trim it takes to compensate
for each configuration change. This information is typically not provided
by the Pilot's Operating Handbook. You need to obtain it empirically. Go
to the practice area and do some experiments at a safe altitude.
First, just fly around for a while at normal cruise airspeed. This lets
you see what the cruise angle of attack looks like; this information comes
in handy on final approach, as discussed in section
12.11.3.
You should also take this opportunity to learn how the airplane responds.
Practice the basic maneuvers as described in previous sections of this chapter.
Acceleration/deceleration is worth practicing; some airplanes are much harder
to slow down than others. Coordinated turns are worth practicing; different
airplanes require different patterns of rudder usage. Nonturning slips are
important for landings; you need to know how much yaw and how much drag
is produced by a given amount of rudder pressure. Phugoids are definitely
worth investigating; different airplanes respond differently.
Next, investigate the effect of the trim wheel. The wheel has bumps on it,
which we can use as our unit of measurement. Move the wheel one bump, and
see what effect that has on the airspeed. If you have electric trim, figure
out how fast it moves (how many bumps per second).
Next, slow down to the airspeed you normally use in the traffic pattern.
Again, get the airplane nicely trimmed and just fly around a while. Make
a note of the angle of attack.
After the airplane is once again flying along, nicely trimmed at pattern
speed, extend one notch of flaps. Maintain the same speed. Make careful note
of how many bumps of trim it takes to maintain constant speed, compensating
for the flap extension. Do not bother to maintain level flight. Leave the
power setting along, and make a note of how much rate of descent is caused
by the drag of the flaps. Also note how the pitch attitude changes; remember
that extending the flaps changes the angle of incidence, as discussed in
section 2.4.
Do the same for each successive notch of flaps. In each case, make careful
note of how much you have to move the trim wheel to maintain constant speed.
Also observe the resulting rate of descent, and observe the change in incidence.
Do the same for other possible configuration changes (landing gear, speed
brakes, et cetera).
After you have done that, investigate the effect of power changes. Determine
how many RPM (or how many inches of manifold pressure) you need to remove
in order to change from level flight to a 500 fpm descent. Also observe
the effect that such a power change has on the trim speed.
Now, during the descent, check the effects of configuration changes again.
You need two sets of observations: one using a power setting appropriate
for level flight in the traffic pattern, and one using a power setting appropriate
for final descent. In an ideal airplane, configuration changes would not
affect the trim, but in a real airplane they do, by an amount that depends
on the power setting.
At this point, you should be able to construct a crib card along the following
lines:
- 300 RPM power reduction (clean), compensate with _____ bumps
- 300 RPM (approach configuration), compensate with _____ bumps
- first notch of flaps (level flight), compensate with _____ bumps
- first notch of flaps (descent power), compensate with _____ bumps
- second notch of flaps (descent power), compensate with _____ bumps
- third notch of flaps (descent power), compensate with _____ bumps
- extend gear, compensate with _____ bumps
- extend speed brakes, compensate with _____ bumps
where each of the blanks gets filled in with some positive number (for nose-up
trim application) or negative number (for nose-down trim application). The
exact values aren't important; the idea is to have enough information to
prevent nasty surprises like the situation described at the beginning of
this section.
Finally, fly around for a while slightly above
minimum controllable airspeed, with flaps extended. See section
16.16 for more discussion of slow flight procedures. Practice rocking
the wings. Make sure you can bank the plane left or right, with reflexively
correct use of ailerons and rudder.
Additional familiarization exercises are discussed in connection with landings
in section
12.11.4.
Familiarizing yourself with a new type of airplane can take a goodly amount
of time, especially if you have modest total pilot experience. On the other
hand, if you are just re-familiarizing yourself with the plane after a period
of inactivity, you can run through the maneuvers fairly quickly.
16.9
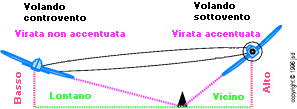
Turns around a Point
Turns are more challenging if you are trying to turn around a specific ground
reference, maintaining a constant distance from it. If there is any significant
wind (which there almost always is), this requires constantly changing bank
angles.
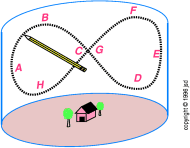
The best way to analyze this situation is to begin by considering what happen
if you do not make any correction for the wind. Figure
16.5 shows three complete turns made using a constant bank angle.
In the absence of wind, you would have performed three perfect circles around
the southeasternmost tree in the orchard. However, since there is some wind,
we can use the principle of relativity. Relative to the air, you have still made three
perfect circles. However, the air itself has moved during the maneuver,
carrying the whole pattern downwind. Therefore relative to the ground, we
see the cycloid pattern shown in the figure.
To transform this pattern into one that is circular relative to the ground,
you need a steeper bank at the points where you are headed downwind (e.g.
point A and neighboring points), and a shallower bank at the points
where you are headed upwind (e.g. point C and neighboring points).
As you can see from table
16.3, the effect can be fairly large.
| speed |
rate |
radius |
bank |
load |
| (knots) |
(°/sec) |
(nm) |
(degrees) |
factor |
| 60 |
2.9 |
0.33 |
9 |
1.0 |
| 75 |
3.6 |
0.33 |
14 |
1.0 |
| 90 |
4.3 |
0.33 |
19 |
1.1 |
| 105 |
5.0 |
0.33 |
26 |
1.1 |
| 120 |
5.7 |
0.33 |
32 |
1.2 |
| 135 |
6.4 |
0.33 |
39 |
1.3 |
| 150 |
7.2 |
0.33 |
45 |
1.4 |
| 165 |
7.9 |
0.33 |
50 |
1.6 |
| 180 |
8.6 |
0.33 |
55 |
1.7 |
If you fly the maneuver at 90 KIAS, your
groundspeed will vary from 105 (downwind) to 75 (upwind). That's a ratio
of 1.4 to 1. Let's assume you remain 1/3rd of a mile from the landmark,
since that is the distance to which the table applies. The speed in the
left-hand column of the table should be taken as a ground speed,
since we want the radius to remain constant as seen from the ground.
The table tells us the required bank angle will vary from 26 degrees at
point A to 14 degrees at point C.
At points B and D in the figure, the bank angle will be the
same as in the no-wind case — but you will need apply wind corrections to
your heading, as discussed in section
16.4.
16.10
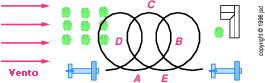
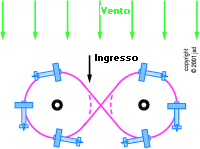
Eights Around Pylons
Eights around pylons are performed by flying turns around a point clockwise
around one pylon, and counterclockwise around another pylon, as shown in
figure
16.6.
You need to choose the right place to roll out of the turn and begin the
straightaway section, so that the two circles will be the same size. It
may help to visualize the desired figure-eight shaped ground track on the
ground, and then just follow that track.
This maneuver is not to be confused with eights on pylons (which
are discussed in section
16.13.2).
16.11
Chandelles
A chandelle is a stylized climbing turn.
The key elements are:
- There is a total heading change of 180 degrees.
- During the first 90 degrees, there is a constant bank and smoothly
increasing pitch attitude.
- During the second 90 degrees, there is a constant pitch attitude and
smoothly decreasing bank.
- Climb power is used.
- At the 180 degree point, the wings are level and the airspeed is just
above the stall.
Normally the maneuver is entered from level flight. If your airplane's manufacturer
has specified a recommended entry speed, use that. Otherwise, cruise airspeed
should do nicely.
The higher the entry speed, the greater the altitude gained during the maneuver.
You can dive if necessary to achieve the chosen entry speed, but be careful
not to overspeed the engine. A high entry speed is absolutely not required.
A chandelle is in some senses a ``maximum performance'' maneuver, but altitude
gain is not one of the things that you are expected to maximize. (If people
wanted absolute maximum altitude gain, they would use a rather different
sequence of bank and pitch attitudes.) The maneuver is judged primarily
on the accuracy and smoothness of the pitch and bank maneuvers.
The maneuver emphasizes headings and attitudes. You should use ground references
to judge the correct headings, but you shouldn't bother to remain over a
particular point or to correct headings for wind drift.
You have some discretion when selecting the initial bank angle. Usually
30 degrees works fine. If the bank is too shallow, during the second half
of the maneuver you will find that the airplane has decelerated to its final
speed before the turn is completed; ideally the final speed and the final
heading should be reached simultaneously. Happily, since the airspeed is
changing only rather slowly at the end, this is relatively easy to arrange.
The end of the maneuver depends on airplane performance. If your airplane
has more than enough power to sustain level flight at stalling angle of attack,
you are in luck. At the end of the maneuver you should lower the nose and
accelerate at constant altitude.
If your airplane cannot sustain level flight at stalling angle of attack,
you should arrange the timing so that at the end of the maneuver you are
momentarily in level flight, at the top of the climb. Then you should lower
the nose and dive gently to obtain an airspeed that will permit acceleration
in level flight. Then level off and accelerate to a normal speed. You will
need more skill and judgment than you would in a more powerful plane.
If you want to learn to do chandelles, it may help to divide the maneuver
into separate ``climb'' and the ``turn'' components. It is sometimes useful
to analyze and practice these components separately.
The second half of the climb contains an interesting lesson. The pitch attitude
and power setting are constant, but the result is very far from being constant
performance. The angle of attack is increasing, the airspeed is decreasing,
and the rate of climb is decreasing.
This second part of the maneuver begins with the airplane climbing rapidly.
The climb angle is, intentionally, unsustainable. The airplane will nevertheless
climb in the short run. For a while, it can climb by cashing in airspeed,
according to the law of the roller coaster.
As the airspeed decreases, the airplane must fly at an ever-higher angle
of attack in order to support its weight. Since the pitch attitude is being
held constant, this means that the direction of flight must be bending over.
This is illustrated in figure 2.11 in section
2.10.
This should drive home the lesson that pitch attitude is not the same as
angle of attack, and that angle of attack (not pitch attitude) is what directly
determines performance.
You should not attempt to micro-manage the altitude during a chandelle.
You should maintain the chosen pitch attitude and let the airplane's intrinsic
vertical damping (and energy budget) take care of the vertical motion.
The choice of pitch attitude with which you begin the second half of the
chandelle is obviously critical, since you will be stuck with it for the
rest of the maneuver. If it is too nose-high, the airplane will decelerate
too quickly and you will run out of airspeed before the turning part of
the maneuver is completed. Conversely, if the pitch attitude is too low,
you will have airspeed left over at the end of the turn. The right answer
depends on the performance of the airplane (and on the timing of the turning
part of the chandelle). The answer can be determined by trial and error.
About 15 degrees is a good initial guess for typical training airplanes.
Now let's examine the turning component of the chandelle. Again, the second
half is the interesting part. The second half, if properly performed, will
take a certain amount of time. You have to roll
the wings level, using a uniform roll rate over that time. If you roll too
slowly, the airplane will turn through 90 degrees before the rollout is
completed. Conversely, if you roll too quickly you will run out of bank
before the 90 degree turn is completed. At each instant, you should estimate
the amount of turn remaining and the amount of bank remaining, and fudge
the roll-rate accordingly. As always, a small
correction early is better than a large correction late. It is useful to
practice this a couple of times in level flight, before combining it with
the climbing component.
When performing the complete maneuver (climbing and turning together) there
is one more wrinkle: Remember that rate of turn depends not only on bank
angle but also (inversely) on airspeed. Since the airspeed is decreasing
during the maneuver, you must take this into account when planning the roll
rate for the complete maneuver.
Also, as the airspeed decreases you will need progressively more right rudder
to compensate for the helical propwash, and progressively more right aileron
to compensate for the rotational drag on the propeller blades. Furthermore,
remember that adverse yaw and the effects of yaw-axis inertia become more
pronounced at low airspeeds (as always). Maintain proper coordination (zero
slip) at all times.
16.12
Lazy Eights
The lazy eight derives its name from
the motion of the airplane's axis during the maneuver. In particular, imagine
that the airplane is at a very high altitude, so we don't need to worry about
the ground getting in the way. Further imagine that the airplane is centered
in a cylinder of paper, 10 miles in diameter and 5 miles high. Also imagine
that the airplane carries a very long pencil sticking out the front, aligned
with airplane's axis. During the course of a lazy eight, the pencil will
draw a giant figure eight, sideways, on the paper.
Figure
16.7 shows some of the details. Start at point A, in level flight.
Pull the nose up. Gradually start banking to the right. At point B,
stop pulling the nose up; let it start going down. Keep the bank; keep turning
to the right. At point C, the pencil slices through the horizon.
The body of the pencil is horizontal, while its tip is moving down and to
the right. Start rolling out the bank. Point D is the lowest pitch
attitude. The bank is about half gone; keep rolling it out. At point E
the pitch attitude and the bank attitude should be level. Pull the pencil
straight up through the horizon. Start rolling to the left. At point F,
start letting the pitch attitude back down again. At point G, the
pencil-point slices through the horizon again, this time moving down and
to the left. Start rolling out the bank. Point H is the lowest point
in the leftward stroke. By the time you return to point A, the pitch
and bank attitudes should be level again. Pull the pencil straight up through
the horizon again, and repeat the maneuver.
For the next level of refinement, arrange the timing and the bank angles
so that point B is 45 degrees of heading away from point A;
point C is at 90 degrees, point D is at 135 degrees, and point
E is at 180 degrees.
For the next level of refinement, arrange the push/pull forces so that points
B and F are about 20 degrees above the horizon, and points
H and D are about 20 degrees below the horizon.
Note that up to this point we have not mentioned anything about altitude
or airspeed. This is primarily an attitude maneuver, and you should
learn it in terms of attitudes.
When learning the maneuver, it helps to separate the ``up/down'' part from
the ``left/right'' part.
The left/right part of the maneuver is quite simple. You just very gradually
roll into a turn to the right, then very gradually roll out. You continue
the roll so it becomes a turn to the left, and then gradually roll out.
The up/down part of the maneuver is almost as simple. You just pull the
nose above the horizon for a while, then lower it to the horizon; let it
go below the horizon, then pull it back to the horizon and repeat.
One tricky part about combining the left/right part with the up/down part:
the vertical motion goes through two cycles (ascending, descending,
ascending, descending) while the horizontal motion is going through only
one (rightward, leftward).
To get a deeper understanding of the maneuver, we must think a little about
the altitudes and airspeeds.
During the whole quadrant from A to C, the nose is above the
horizon. The airplane is climbing and decelerating. Therefore C is
the point with the highest altitude and the lowest airspeed. Point C
has a high altitude even though we (correctly) drew it in the figure on
the same line as point A. That is because the maneuver is defined
in terms of attitude, not altitude, and we imagine that the paper on which
the lazy eight is drawn is so far away that the pencil has lots of leverage
— the angle matters a lot, and the altitude matters hardly at all.
To you, the low airspeed at C is more immediately noticeable than
anything else. The airplane is below its trim speed, so the nose wants to
drop all by itself. At this point you will not need to push on the yoke;
you just need to reduce the back pressure to let the nose go down at the
desired rate.
During the whole quadrant from C to E, the nose is below the
horizon. The airplane is descending and accelerating. Therefore point E
is has a much lower altitude than point C, and indeed should be level
with point A.
The second ascending/descending cycle (from E back to A) should
be pretty similar to the first.
The commercial-pilot Practical Test Standard
requires that you return to your initial altitude and airspeed every time
you pass point A and point E. You might hope that this would
happen automatically if you leave the throttle setting alone, relying on
the law of the roller coaster. But that hope is in vain, for the following
reason.
Normally you start the maneuver at a speed well above VY, with a power setting appropriate for level flight
at this speed. Now suppose you fly a nice smooth symmetric maneuver that
returns to the original airspeed. The maneuver starts with a pull, and at
all times you will have an airspeed at or below the initial airspeed. You
will be flying the maneuver at more-efficient airspeeds, closer to VY.6 You will gain energy. You will gain altitude.
If you try to fix the altitude by diving, you will end up with excess airspeed.
The only way to make things come out even is to fly the maneuver using a
slightly-reduced power setting. This is most noticeable in airplanes with
big engines and long wings, where the normal operating speeds are large
compared to VY.
This maneuver contains a very nice lesson about the principles of flight.
Much of the vertical part of the maneuver can be considered a ``controlled
phugoid''. In particular, during the phase from B to D the
nose is dropping but you are not pushing it down — indeed you are maintaining
back pressure as you gently lower the nose. The feeling is sort of like
the feeling you get when lowering a heavy object on a rope, and is quite
striking.
This should drive home the message that the airplane is definitely not trimmed
for a definite pitch attitude — it is trimmed for a definite angle of attack
(or, approximately, a definite airspeed). At point C, among others,
the airplane is well below its trim speed, so it wants to dive and rebuild
its airspeed.
As the final level of refinement, you should make the altitudes at points
A and E come out equal. You can do this by fudging the attitudes
and/or power settings at strategic points in each half-cycle.
You have considerable discretion as to the steepness of the banks. Increasing
it just speeds up the whole maneuver. A typical choice is to have 30 degrees
of bank at points C and G (the points of maximum bank).
A lesser bank is also fine, but then you will want to choose a lesser nose-high
attitude at points B and F. This is because you will be spending
more time ascending, and you don't want to run out of airspeed. Make sure
the airspeed at points C and G is 5 or 10 percent above the
stall.
As with the chandelle, you will have to work a bit to maintain proper coordination.
There is nothing surprising — just a wide range of roll rates and a wide
range of airspeeds.
16.13
Eights on Pylons
The ``eights on pylons'' maneuver is required on the commercial and flight
instructor practical tests. Being able to do this maneuver well, especially
if there is a wind, definitely demonstrates that you can control the airplane
around all axes at once.
This maneuver is not to be confused with eights ``around'' pylons (which
are discussed in section
16.10). The ambiguous term ``pylon eights'' should be avoided.
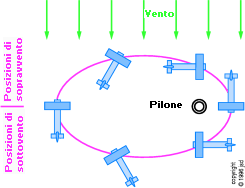
16.13.1
Turns on a Pylon
Before we cover the ``eights on pylons'' maneuver (section
16.13.2, we need to discuss a little theory. We begin by considering
turns on a (single) pylon.
The idea is simple: Imagine a pointer that pokes through the plane from
wingtip to wingtip, parallel to the pitch axis; you want this pointer to
remain pointed directly at the base of the pylon. This is quite a restriction;
it means that at each point in the maneuver your bank and heading are completely
determined by your altitude and position relative to the pylon. The only
thing that makes the maneuver possible at all is that you are free to adjust
your altitude.
*
No-Wind Case
In the absence of wind, the maneuver will work at a particular altitude
— the so-called pivotal altitude — and not otherwise. Interestingly, the
pivotal altitude does not depend on what you choose as your distance from
the pylon. As shown in figure
16.8, if you start close to the pylon, you will have a large bank angle
and therefore a lot of Gs. But since you are close to the pylon,
the circle will be small, and you will need a lot of Gs in order
to change the airplane's velocity (from northbound to southbound and back)
in the small time available. In contrast, if you start out far from the
pylon, the bank will be shallow, and you will pull a smaller number of Gs
for a longer time.
The pivotal altitude is proportional to the square of the airspeed: 0.0885
feet per knot squared, or 885 feet per (hundred knots) squared.
If you happen to be above the pivotal altitude, the airplane will be banked
too steeply and will turn too quickly. Your sight-line past your wingtip,
which is supposed to be pointed at the pylon, will be swept backward and
will appear to fall behind the pylon. Or to say it the other way, the pylon
will appear to be moving ahead of where you want it to be. The solution
is to descend. At the lower altitude your bank will be less, and the problem
will correct itself. Any airspeed you gain during the descent can only help
you by further reducing the rate of turn.
Conversely, if you are too low, the bank will be too shallow and the pylon
will appear to fall behind where you want it to be.
The rule is simple: go down to speed up and ``catch'' the pylon; go up to
slow down and ``wait for'' the pylon.
You may be tempted to use the rudder to swing one wingtip a little bit forward
or backward, but this defeats the purpose of the maneuver and is not
the correct procedure.
*
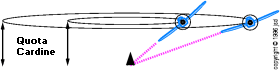
Windy Case
In the presence of wind, the pattern is no longer a perfect circle. In fact,
the ground track is an ellipse with the pylon at one focus. You are nearest
the pylon when the airplane is headed directly downwind. This gives max
bank when flying downwind, which makes a certain amount of sense — you want
to bank more steeply when the groundspeed is highest. This is shown in figure
16.9.
The wind also prevents you from flying the pattern at constant altitude
(for reasons that will be discussed below). The altitude is highest when
the airplane is headed directly downwind. This is shown in figure
16.10. Once again, this contributes to creating max bank when flying
downwind, which makes sense.
There are two strategies, depending on how much the plane speeds up when
it descends.
- a
- If you fly the pattern at high speed (i.e., well above VY), then tiny changes in airspeed will give you plenty
of up-and-down action. I call this the constant-airspeed case.
- b
- If you fly the pattern at a speed near VY,
then changing the airspeed has only a small effect on the long-term power
required — all you are doing is making a one-time exchange of potential
energy for kinetic energy according to the law of the roller-coaster. I call this the constant energy case.
The typical case will lie somewhere in between; fortunately the answers
in the two cases are not very different.
- a
- In the constant-airspeed case, the ground track is a mathematically
perfect ellipse. The altitude turns out to be inversely proportional to
your distance from the pylon, which can be a surprisingly large excursion
even in moderate winds.
- b
- In the constant-energy case, the ground track deviates only imperceptibly
from an ellipse (the distance deviation is less than 1%, even when the
wind is 30% of your airspeed). The altitude variation (as a percentage)
is about one-third as large as the variation in distance from the pylon.
When going upwind, you need to turn a lot slower. There are three factors
at work:
- you are farther away, so the bank angle is less (by geometry);
- you are lower, so the bank angle is less (also by geometry); and
- in the constant-energy case, you are going faster (making more forward
progress per unit turn).
The first two factors are diagrammed in figure
16.11. In the constant-airspeed case factor 1 does half the job and
factor 2 does the other half. In the constant-energy case they all three
divide the job, roughly in the ratio 50% : 20% : 30%.
By geometry, the angle of bank is inversely proportional to the distance
r from the pylon. It is also proportional to height. In the constant-airspeed
case, the height is itself inversely proportional to r. Combining
these, you get that the airplane is ``attracted'' toward the pylon with
an acceleration that goes like 1/r2.
You may recognize this situation from astronomy:
an inverse-square central force. So it's not surprising you get a Keplerian
ellipse. The airplane will sweep out equal areas in equal time, and its
angular momentum about the pylon will be constant.
In the zero-wind case, the pivotal altitude is simply proportional to groundspeed
squared. Several well-known books try to argue that on the upwind leg of
the turn on pylon, the groundspeed is lower, so the altitude should be lower.
That is a false explanation (even though the altitude is indeed lower there).
The actual altitude change is much less than you would predict by the groundspeed
argument (by a factor of 2 in the constant-airspeed case and by a factor
of 4 or so in the constant-energy case).
You may wonder how this can be — how can the airplane keep the wing on the
pylon if it is not at the pivotal altitude? The answer is simple: we are
not trying to fly a circular pattern. Recall that if you are above
the pivotal altitude, the airplane will spiral toward the pylon. This is
exactly what is happening in half of the elliptical pattern — the airplane
is above the pivotal altitude and flying gradually closer to the pylon.
Why is the center of the pattern shifted crosswind rather than downwind
of the pylon? For sake of discussion, let's divide the pattern in half along
the long axis (which includes the pylon). If the airplane is positioned
to windward of this line, it is subject to a crosswind from outside the
pattern, which tends to drift the plane sideways closer to the pylon, making
the bank steeper. This effect occurs throughout the windward half, so the
plane is closest and steepest when it crosses from the
windward to the leeward half (at which point it is headed directly downwind).
For these turns on pylons (unlike turns around pylons),
there is nothing you can do to prevent the plane from being blown sideways.
Consider the point where the plane is directly upwind of the pylon. The
heading is constrained to be directly across the wind. The pilot cannot
crab into the wind. Therefore the plane will be blown toward the pylon.
By the same token, whenever the airplane is on the leeward side of dividing
line, it is subject to a crosswind from inside the pattern, which tends
to drift the plane sideways farther from the pylon and hence make the bank
shallower. The effect is cumulative, so the plane is farthest and
shallowest when it crosses from the leeward to windward half (at
which point it is headed directly upwind).
Also, draw a line from the pylon to a generic point on the ellipse. The
wings of the plane, at that point, will lie on that line; the heading of
the plane will be perpendicular to that line. Except for the two special
points at the ends of the ellipse, the heading will not be tangent to the
ellipse; the angle between the heading and the tangent is precisely the
crosswind correction angle. You will note that the plane is always crabbed
into the wind. This can be seen in figure
16.9.
16.13.2
Eights on Pylons
The eights-on-pylon maneuver consists of a turn on one pylon followed by
an opposite-direction turn on another pylon, as shown in figure
16.12. The two-pylon maneuver adds the complexity of planning when to
shift from one pylon to the other, but is actually easier to perform
because you can use the straightaway between turns to recover from any small
errors.
You don't want to pick pylons that are too close together. You do want pylons
that are crosswind from each other, so that the pattern will be symmetric.
It is good to enter on a downwind heading, as shown in the figure, so that
your first turn will be your steepest turn. Maintain coordination; don't
fudge things with the rudder.
In flight, you can follow these simple rules:
- If the pointer is above or below the base of the pylon, it's easy
to fix; just change your bank angle.
- If the pointer is behind the pylon, go down to accelerate and ``catch''
the pylon.
- If the pointer is ahead of the pylon, go up to decelerate and ``wait
for'' the pylon.
In principle, these rules are all you need to know. However, the other information
in this section makes your job 1000% easier. It allows you to anticipate
the required altitude changes and the elliptical ground track. Anticipating
the required actions is easier than waiting until there is an error and
then making corrections.
16.14
Changing Headwinds and Tailwinds
In some ways, an airplane performs differently when going downwind as opposed
to upwind — and in other ways it doesn't. There are a lot of misconceptions
about both halves of this statement.
Let us first consider the situation where there is a steady wind; that is,
a wind that does not vary with time or with altitude.
| Maneuvers relative to a ground
reference will be different when headed downwind as opposed to upwind.
|
|
Maneuvers that do not involve
a ground reference will be unaffected by the wind. |
| For instance, the airplane
will climb and descend at a steeper angle (in terms of altitude
per mile over the ground) when headed upwind. |
|
For instance, the airplane
will climb and descend at a rate (in terms of altitude per
minute) that is independent of the wind. |
| Similarly, a constant-radius
turn relative to a ground reference will require a steeper bank on
downwind and a shallower bank on upwind. |
|
Similarly, a constant-radius
turn relative to a cloud will require the same angle of bank throughout
the maneuver.
The point
is that the airplane, the cloud, and the airmass are one big uniform
moving system. By Galileo's principle of relativity, the overall uniform
motion doesn't matter. |
Note that obstacle clearance is an important
ground-reference maneuver. Your rate of climb is unaffected by the wind,
but your angle of climb is affected.
You can climb at a steeper angle on an upwind heading.
Finally, consider ground observers' perceptions. There are some maneuvers,
such as an aerobatic loop, that should not be corrected for the
wind. Imagine you are using a smoke generator.
You want the smoke to form a nice round loop. Like the cloud mentioned above,
the smoke is comoving with the air, so the overall wind speed shouldn't
matter. However, especially if the smoke generator is turned off, the maneuver
will appear different to an observer on the ground. This appearance
does not (and should not) matter to the pilot in the cockpit, but it does
matter if you are on the ground piloting a radio-controlled model, or judging
an aerobatic contest.
There are several good reasons for being aware of your groundspeed, including:
- You need it for navigation, as discussed
in section 14.2.
- If you are flying cross-country and the groundspeed is lower than you
planned for, recalculate your arrival time and re-appraise your fuel
situation. All too many people run out of fuel because of unexpected
headwinds.
- If you are about to land and the groundspeed seems abnormally high,
you should consider the possibility that you have a tailwind. Go around,
check the windsock, and try again.
On the other hand, during turns and other maneuvers, it would make absolutely
no sense to try to maintain constant groundspeed.
16.14.2
Albatross Effect: Winds that Vary with Altitude
In the real world, the wind almost always changes with altitude. In particular,
it is very common to find that the wind at ground level is blowing in the
same general direction as the wind at 3000 feet AGL, but at a much lower
speed. This is because of friction between the air and the surface.
Most of this frictional windshear is concentrated at the lowest altitudes.
At low altitudes, it is common to see a windshear of several knots per hundred
feet, while at enroute altitudes (several thousand feet AGL) it is more
typical to see a windshear of a few knots per thousand feet.
Wooded areas, tall buildings, and/or steep hills upwind of your position
can create particularly sharp shear layers.
On top of this, frontal activity (especially
warm fronts) can cause very large windshears that are more complicated and
less predictable than the normal, every-day frictional wind shear. I once
was making an approach to a rather short, obstructed
field. The windsock indicated that I had five or ten knots of headwind on
the chosen runway, but the airplane acted as if I had at least 20 knots
of tailwind on final. Even with zero engine power and full flaps I could
not get the airplane to descend steeply enough to stay on the glide slope.
Three approaches in a row ended in go-arounds (which allowed me to carefully
check the windsock three times). On the fourth approach, by anticipating
the windshear, I was able to make a reasonable landing. About half an hour
later the surface wind shifted 180 degrees. This was consistent with the
forecast warm front.
The situation in this anecdote (increasing headwind on final approach) is
very atypical. The other 99.9% of the time there is a decreasing
headwind as you descend on final. For the same
reason, you expect to see an increasing headwind as you climb upwind on
initial departure.
Let's analyze the effect of windshear. Suppose you start out at point A,
and fly to point B where because of a windshear there is more headwind
(or less tailwind). If the windshear is sudden, you will notice a sudden
increase in airspeed. The windshear has added something to your energy7 budget. If the shear is more gradual, the airplane
(because it is trimmed for a definite angle of attack) will probably convert
the extra airspeed into extra altitude, but you will still wind up at point
B with more energy than you would have without the windshear. During
climb, this is great. It makes it look like you have a more powerful engine.
(On short-field approach, as in the atypical anecdote above, this is not
so good; the airplane behaves as if your engine were producing a fair amount
of power even with the throttle at idle.)
We can apply the same line of reasoning to the opposite case: suppose you
start out at point C and fly to a point D where (again because
of a windshear) you have less headwind or more tailwind. This means you
will arrive at point D with less energy than you would have without
the windshear. This commonly happens on approach, where you are descending
into a decreasing headwind. This might be a good thing, allowing you to
fly a steeper approach. On the other hand, a sudden decrease in headwind
could rob you of energy at a critical time.
The energy that comes from an increasing headwind can be put to good use.
I call it the albatross effect. The albatross is a huge bird that
spends its life flying over the oceans of the world. It rarely needs to
flap its wings, but it doesn't soar in updrafts the way hawks do. Instead,
the albatross flies a figure-eight pattern in the shear zone near the surface,
climbing into an increasing headwind on the upwind legs and descending into
a decreasing tailwind on the downwind legs — gaining energy both ways.
Note that on a typical approach, the wind makes the angle of descent steeper
in two ways:
- the groundspeed is lower, due to the average overall headwind
(as discussed in the previous section), and
- the rate of descent is faster, due to the decreasing headwind
(albatross effect).
16.14.3
Turning Downwind; Energy Budget
The previous section discussed how you could gain or lose energy due
to a windshear. In this section, we return to considering only a steady
wind, and discuss what happens if you convert a headwind into a tailwind
simply by turning the airplane.
Let's consider the scenario described in table
16.4.
| true airspeed |
100 knots |
| initial heading |
north |
| final heading |
south |
| time spent turning |
1.2 min = .02 hour |
| mass of airplane |
1 ton |
| wind speed |
20 knots |
| wind direction |
from the north |
Let's calculate the energy and momentum twice, as shown in table
16.5. In the ``balloon''
column everything is measured relative to an observer in a balloon (comoving with the air mass), and in the ``ground''
column everything is measured relative to an observer on the ground.
|
balloon |
ground |
| initial momentum |
100 |
80 |
| final momentum |
-100 |
-120 |
| change in momentum |
-200 |
-200 |
| average N-S force |
10000 |
10000 |
| initial energy |
5000 |
3200 |
| final energy |
5000 |
7200 |
| change in energy required |
0 |
4000 |
| N-S distance during turn |
0 |
.4 |
| energy provided by wind |
0 |
4000 |
Here's what the first
four rows mean: The momentum is calculated using the usual formula: mass
times velocity. (The units here are rather strange, tons time knots, but
it's OK as long as consistent units are used throughout the calculation.)
The North-South component of the average force is just the change in momentum
divided by the time. We see that although the initial and final momenta
appear different in the two columns, the change in momentum is the same.
This upholds Galileo's
principle of relativity: the force required to turn the airplane is independent
of the frame of reference.
Here's what the last five rows mean: The energy is calculated using the
usual formula: one half of the mass times velocity squared. According to
the ground observer, the airplane needs to gain quite a lot of energy during
the turn. You may be wondering where this energy comes from. Obviously it
does not come from the airplane's engine. Actually it gains energy the same
way a baseball gains energy when it is struck by a bat. You know that although a ball does not gain
any energy when it bounces off a stationary wall, it does gain energy when
it bounces off a fast-moving bat. The energy gain is force times distance
(counting only distance in the same direction as the force). According to
the observer in the balloon, the force of the turn is (at every instant)
perpendicular to the direction of the force, so there is no energy gain.
Meanwhile, according to the observer on the ground, the wind moves
the airplane 0.4 miles in the North-South direction during the turn, and
turning the airplane requires a huge force in this direction. This effect
— the airplane being batted by the wind — supplies exactly the needed energy.
Again, we see that the principle of relativity is upheld: the energy budget
works out OK no matter what frame of reference is used.
Note that if you overlooked the bat effect you would fool yourself into
thinking that turning downwind caused a huge energy deficit. It doesn't.
Don't worry about it.
16.14.4
Summary: Changing Headwinds and Tailwinds
- For ground-reference maneuvers, a steady wind has a direct effect.
- For other maneuvers, a steady wind has no effect on the airplane or
on the pilot in the cockpit. However, the maneuvers will appear different
to ground-based observers.
- In the presence of windshears, you can gain or lose energy due to the
albatross effect. In real life, this means for instance that you will
get slightly better performance climbing into the wind. This gives you
a reason to turn downwind a little later than you otherwise would.
- To a ground-based observer, the airplane actually does have more energy
on downwind. It picks up this energy by being batted by the wind during
the turn.
16.15
Remarks: Ground Reference Maneuvers
16.15.1
Accounting for the Wind
Throughout each flight — and certainly before starting any ground reference
maneuvers — you should have in mind a good estimate of the speed and direction
of the wind. There are various ways you can figure this out
- Remember the ``winds aloft'' forecast. Sometimes it's even right.
- ATIS and AWOS
broadcasts give the surface winds.
- The airport windsocks give information about
surface winds.
- Ordinary flags provide similar information.
- The smoke or vapor from smokestacks is an
excellent indicator of the winds near the ground and sometimes winds aloft.
- If you see ripples on a pond at one side
and not the other, the wind is very likely blowing from the unrippled
side toward the rippled side. Also, the texture of the ripples generally
runs crosswise to the wind.
- Last but not least, you can note the amount of wind correction needed
to perform ground-reference maneuvers.
It is a good idea to know the wind before starting a maneuver (rather
than trying to figure it out ``on the fly''). It really helps to be able
to plan the maneuver and anticipate the necessary wind corrections.
16.15.2
Entry Strategy
It is a good idea to begin ground-reference maneuvers such (as turns around
a point) a downwind heading, as shown in figure
16.5, so that your first bank will be your steepest bank. You don't
want to be a position where (late in the maneuver) you must choose between
abandoning the effort or using an excessive bank angle.
16.15.3
Visual Reference
It really helps to have a precise visual reference for pitch and yaw, as
discussed in section
11.5.2.
You can use your finger and/or a mark on the windshield, as illustrated
in figure
11.3. If you can't find a suitable mark on the windshield, you can make
one.
The reference should be directly in front of your dominant eye. It is a
common mistake to choose a mark on the cowling. Such a mark is below where
it should be, and tempts you to use too much rudder when rolling into right
turns, and too little rudder when rolling into left turns. It is another
common mistake to choose a reference point that is on the centerline of
the airplane. Assuming your eye is quite a bit to the left of the centerline,
your sight line through this point is very far from being parallel to the
axis of the airplane. This tempts you to make diving left turns and climbing
right turns.
As you become more experienced, you won't need to use your finger or an
explicit mark on the windshield; you can just imagine where the
reference point must be. Just make sure you use a point directly in front
of your dominant eye.
You want to take a systematic approach to all maneuvers. John Beck teaches
a ``mental checklist'' for ground reference maneuvers:
- Pick a mark on the windshield; trace a line along the horizon.
- Check for traffic.
- Check your ground reference.
- Check your instruments.
Repeat this list to yourself over and over again as you do the maneuver.
Chant it aloud if you wish. Doing each thing as you say it not only keeps
you from overlooking something, but also gives a nice rhythm to the work.
16.16
Slow Flight
If you are not proficient in handling the plane at low speeds, you have
no business trying to land the plane.
To begin a practice session, go up to a safe altitude and make sure there
are no other aircraft nearby. Decelerate to a speed, say, 15 knots above
the stall speed. Once you are comfortable with this, reduce the speed another
5 knots. Again, once you are comfortable, reduce the speed another 5 knots.
During the maneuver, you should
- Maintain coordination — keep the ball in the center.
- Maintain a definite altitude.
- Watch out for other traffic. Your pitch attitude will be so high that
it will be difficult or impossible to see over the nose, so you should
change heading every so often and look around.
- Between turns, maintain a definite heading — don't let the nose wander
willy-nilly.
- Keep an eye on the engine gauges — there are some aircraft that will
overheat if you spend too much time in a low-airspeed, high-power configuration.
16.16.1
Airspeed and Altitude
As discussed in section
7.3 and elsewhere, it would be OK to use the yoke to control altitude
if you were on the front side of the power curve and you
were willing to accept an airspeed excursion. However, during this slow
flight maneuver, you definitely are not on the front side of the power curve
and you definitely cannot tolerate airspeed excursions.
Therefore you will need to use the yoke (and trim) to control airspeed,
and once you've got the desired airspeed, you will need to use the throttle
to control altitude. (To adjust airspeed at constant altitude, you will
need to use the throttle and yoke together, as discussed in section
16.2.)
Remember that the airplane is optimized for cruise flight. During cruise,
you can fly straight and level with little or no control force, and you
can make gentle turns with little or no use of the rudders, using ailerons
alone.
In contrast, during slow flight
- You will need steady rudder deflection to overcome the helical propwash
effect.
- You will need steady aileron deflection to overcome the rotational
drag of the propeller.
- You will need considerable rudder deflection whenever the ailerons
are deflected, to deal with adverse yaw and roll-axis inertia.
Because (as discussed in section
5) there will be very little roll damping, you will need to apply lots
of little aileron deflections to maintain wings-level flight, especially
in the presence of turbulence.
16.16.3
Procedures and Perceptions
Make a note of the pitch attitude that corresponds to level flight at minimum
controllable airspeed (with and without flaps). Note the pitch attitude
of the nose against the forward horizon, and the wingtip against the lateral
horizon. This information will come in very handy during landing, as discussed
in section
12.11.3.
Practice rocking the wings. Make sure you can bank the plane left or right,
with reflexively correct use of ailerons and rudder. Practice making turns
to a precise heading.
Practice diving 50 feet. That is, push the nose down a few degrees (not
so much that you experience negative G loads), dive for a few seconds, and then pull back and
level out. Make a note of how much airspeed you gain by diving 50 feet.
This information will come in handy during stall recoveries, as discussed
in the next section.
16.17
Stall Practice
- It should go without saying, but here goes: Make absolutely sure there
are no other airplanes near you during stall practice. In particular,
you will need to make frequent clearing turns to rule out the possibility
that there are some folks behind and below you, who might be very surprised
and annoyed if your drop down onto them.
- Make sure you practice stalls at an altitude that gives a generous
margin of safety. An intentional stall can
easily lead to an unintentional spin, and a spin recovery can eat up a
lot of altitude.
- Finally, a word about the philosophy of stall recovery: Try to recover
with minimum loss of altitude. Imagine that you were flying at 100 feet
AGL and then did something stupid that led to a stall. The idea is to
recover from the stall and climb back to a safe altitude, without ever
losing more than 100 feet. Therefore the emphasis is on recognition
and recovery: prompt recognition that the stall has occurred,
and proper technique during the recovery.
There are many variations on the stall maneuver. You can stall the airplane
with or without flaps extended, with or without power, during straight or
turning flight, while pulling one or multiple Gs, and during level, climbing, or descending flight.
To keep the discussion simple, let's first go through one specific scenario,
and discuss the possible variations later.
Scenario #1: Start out in level flight at a typical traffic-pattern speed,
in the landing configuration (full flaps extended,8 landing gear extended, carb heat on, et cetera).
Then reduce the power to idle. As the airplane decelerates, pull back on
the yoke at a steady rate, cashing in airspeed to pay for drag, maintaining
altitude. Maintain constant heading. Maintain coordination. When the airspeed
gets low enough, you may observe a sudden, distinct stall. The nose will
drop, even though you are pulling back on the yoke. Obviously it is time
to begin your stall recovery, as discussed below.
16.17.2
Provoking a Distinct Stall
However, it is quite possible you will not always observe a sudden, distinct
stall. In particular, if your airplane is loaded so that its center of mass
is right at the forward edge of the weight and balance envelope, you may
be unable to deflect the elevator enough to cause a stall using the procedure
described above.9 At this point you are at a very low airspeed,
unable to stall the airplane, and unable maintain altitude by pulling back
on the yoke. At this point you should declare an end to the attempted stall
and begin your stall recovery procedure. The ability to recognize the low-speed
limit of performance in this situation is valuable, and should be practiced,
but you should practice full-blown stalls also.
The most elegant way to improve your chances of observing a full-blown stall
is to move the center of mass farther aft, using ballast. As described in
section
6.1.9, 100 pounds of water stowed securely in the back of the airplane10 should make it a whole lot easier to raise
the nose.
Another trick that might increase your control authority is to use a little
bit of engine power, perhaps 1500 RPM. On many airplanes the propwash flowing
over the elevator increases the control authority by just enough to permit
a quite distinct stall. On other airplanes (including those with high T-tails,
and others) this trick doesn't work at all — the propwash over the wings
lowers the stalling speed more than the propwash over the tail improves the
control authority.
A third way to provoke a distinct stall is to zoom a little bit. That is,
you maintain constant altitude while you decelerate most of the
way. Keep track of how far back you have pulled back on the yoke. When you
have used up most of the available backward motion, use the last inch or
so to pull back faster than would be needed to maintain 100% level flight.
The airplane will rotate to a more nose-high attitude, climb a few feet,
then stall.
16.17.3
Stall Recovery
Stall recovery, especially for poorly-trained pilots, poses psychological
problems. In particular, if you are laboring under the dangerous misconception
that the yoke is the up/down control, your instincts will be all wrong:
the nose is dropping and the airplane is losing altitude, so you will be
tempted to pull back on the yoke. This makes a bad situation much worse.
The correct way to think about the stall is to realize that the shortage
of airspeed is your biggest problem. You need to push on the yoke and dive to regain airspeed.
In addition to the airspeed problem, you also have an energy problem. Therefore, while you are pushing on the
yoke with one hand, you should be pushing on the throttle with the other
hand.
As a further step to improve the energy situation, remove unnecessary drag.
On most airplanes with N notches of flaps, the first several notches
are somewhat helpful, because they allow you to fly slowly without stalling.
The Nth notch, however, typically doesn't contribute much to lowering
the stall speed, and just adds a lot of drag. This would be useful if you
were trying to descend, but since we are trying to climb at the moment,
you should retract the Nth notch of flaps as early as possible
during the stall recovery. If the maneuver began with less than full flaps
extended, leave the flaps alone, dive to regain airspeed, and then gradually
retract the flaps.
While all this is going on, you should use the rudder and ailerons to keep
the wings level and maintain a more-or-less constant heading.
You don't need to dive very far to regain a reasonable
flying speed. According to the law of the roller coaster (as discussed in
section
1.2.1), if you start out at 45 knots and dive 45 feet, you will wind
up at 55 knots. If you start out at 50 knots and dive 80 feet, you will
wind up at 65 knots.11
At the bottom of the dive, perform a nice gentle pull-out. If you pull too
rapidly, you put a big G load on the wings,
which will cause them to stall at a speed that would otherwise have been
just fine.
After you have leveled out at the bottom of the dive, accelerate horizontally
to best-climb airspeed. Retract any remaining flaps as you accelerate. Then
climb at VY to a safe altitude.
To summarize: the key elements of stall recovery include
- Dive to regain airspeed.
- Apply power.
- Reduce drag.
- Maintain wings level.
- Climb back to a safe altitude.
16.17.4
Power-On Stalls
A non-pilot might have thought that it would be hard to stall an airplane
with the engine at full power, but in fact it is quite possible, and the
accident statistics show that it happens fairly frequently. Therefore let's
consider another scenario:
At a safe altitude in the practice area, set up for a power-off descent
in the landing configuration. In particular, let this be a short-field approach, with the airplane trimmed to fly at the lowest
practical airspeed. Then apply full power, as if for a go-around. In some airplanes (including the widely-used
C-152, C-172, and C-182), and depending on where the center of mass is,
this combination of trim, flaps, and power will cause the nose to pitch up quite dramatically.
The airplane will climb very steeply and then stall. You don't need to pull
back at all. Indeed, you may want to push a little bit so that the stall
won't be too extreme.
In airplanes with better go-around characteristics (including a C-172 with
the flaps retracted) you will need to work a little harder to perform a
power-on stall. A possible — but not very stylish — way to perform this
maneuver would be to start from cruising flight, add full power, and pull
back until you get a stall. This is perhaps worth doing once, but it is
not the recommended way of demonstrating a power-on stall, because results
in climbing an unnecessarily long way. That is, it just isn't logical to
apply full power while you are trying to decelerate. Therefore the conventional
procedure is this: At a safe altitude, reduce power and decelerate
in level flight to a speed a few knots above the stall. Then add power.
(Use partial power the first time, and then use progressively more power
as you learn how the airplane behaves.) Then gradually pull back some more.
As the airspeed bleeds off, you will need to apply more and more right12 rudder to maintain coordination (i.e. to compensate
for the helical propwash). Coordination is very
important, because even a slight slip angle will cause one wing to stall
before the other. This could easily result in a spin,
and even if you don't get a full-blown spin, the sudden change in bank angle
is pretty unpleasant.
Also, in this high-power low-airspeed situation, you will need to apply
steady right aileron (to compensate for the rotational drag of the propeller).
Note that (as discussed in section
5.4.2) the roll damping goes to zero at about
the same point where the stall occurs, so you will need to intervene rather
actively to keep the wings level. The standard advice applies: make sure
you use the ailerons and rudder together. Because the airspeed is low, you
will need a whole lot of rudder deflection to coordinate with a small amount
of aileron deflection, and indeed right near the stall you can quite nicely
control the bank angle using the rudder alone. Imagine that the left wing
is about to stall. By stepping on the right rudder pedal, you can swing
the nose to the right, causing the left wing to speed up and become unstalled.
During this maneuver, you might want to lower the nose a tiny bit, so the
right wing, which is swinging backwards, doesn't stall.
If you manage to maintain perfect coordination and perfectly level wings
right up to the point of the power-on stall, you can still expect that the
airplane will want to yaw and roll to the left just after the stall. There
are several factors at work:
- As discussed above, you are holding steady right aileron. This increases
the effective angle of attack of the left wing, so it will stall first.
The airplane will roll to the left.
- The helical propwash causes the airflow
to hit the left wing root area at a higher angle, and the right wing root
area at a lower angle. This also causes the left wing to stall first.
The airplane will roll to the left.
- There is gyroscopic precession. That is,
when the lift of the wings is suddenly reduced (while the lift at the
tail is unchanged), it produces a torque — a nose-down pitching moment.
In the absence of gyroscopic effects, this would cause the nose to drop,
but as discussed in section
19.9.2, the rule for gyroscopes is that the force is 90 degrees ahead of the motion. This means
that the torque around the pitch axis will cause a motion around the yaw
axis — in this case, a yaw to the left. See figure
19.15. The resulting yaw will swing the left wing backwards, making
it more stalled. The airplane will yaw to the left and roll to the left.
Of course, you can anticipate this, and apply additional right rudder as
the nose drops. With a little experience, you can arrange that the wings
stay level and the nose drops straight ahead.
The recovery from a power-on stall is basically the same: dive to regain
airspeed, add power (if you were not already at full power), maintain wings
level, reduce drag, and climb back to a safe altitude.
The practical test standard calls for performing power-on stalls with the
flaps in the takeoff configuration and gear down (the takeoff configuration)
or gear retracted (departure configuration) which simulates a stall happening
shortly after takeoff. It is well worth practicing other configurations,
too — particularly the approach configuration, which simulates what might
happen if you mishandle a go-around.
16.17.5
Accelerated Stalls
The stall occurs at a definite angle of attack. This is not quite the same
as a definite airspeed, for reasons discussed in section 2.12.5.
As an example: if you are in a 45 degree bank, the load factor is 1.4, and
the stalling speed will be 20% higher than it would be in ordinary one-G
flight. Therefore, if you are relying on the airspeed indicator to warn
you of an impending stall, you will be fooled.
Ironically, in some ways recovery from an accelerated stall is easier, because
of the extra airspeed. You may not have to dive any significant distance.
Otherwise, the procedure is the same: reduce the back pressure (and dive
if necessary to regain airspeed), roll the wings level, add power, reduce
drag, and climb back to a safe altitude.
It is the bank itself that makes a turning stall exciting. If you start
out banked 45 degrees to the left, and then (due to a lapse in coordination,
and/or any of the other factors discussed in section
16.17.4) the left wing drops another 45 degrees, you could wind up in
a knife-edge attitude. If this happens, push forward on the yoke to the
position that corresponds to zero angle of attack, so there is no load on
the wings. Then just sit there for a second or two. The rudder will cause
a rotation around the now-horizontal yaw axis, so that the airplane is soon
pointing somewhat nose-down. After the airplane has dived a couple dozen
feet, you will have enough airspeed that the ailerons are effective. Use
the ailerons to roll the wings level, then pull out of the dive in the usual
way.
Another thing that makes accelerated stalls a bit more challenging has to
do with perception of the stall. Imagine an airplane where (due to a lack
of nose-up elevator authority or whatever) the stall doesn't "break" suddenly.
Then as you approach an ordinary, straight-ahead stall, you have a constant
heading and everything looks fairly normal. You can devote a lot of attention
to looking for subtle signs of the stall. Now contrast that with a stall
during a 60-degree bank. The pitch axis is not horizontal, so any pitch
change will move the nose mostly along the horizon, not perpendicular to
the horizon. Also, no single outside reference stays in front of the nose
for very long, so subtle pitch changes are quite a bit harder to notice.
A student once complained ``I can't get this thing to stall''. I replied
``We're going down more than 2000 feet per minute. This is stalled enough
for me''.
Finally, steep turns are not the only way that an accelerated stall can
arise. A sharp pull-up with wings level will do it. In an aerobatic loop, for instance, you are pulling about 4 Gs
at the bottom, so the stalling speed is about twice what it would be in
ordinary unaccelerated flight. Especially since you might be rapidly approaching
the ground at this point, there is a strong temptation to pull back, but
be careful, because this would be a really inopportune time to stall. Make
sure you have plenty of altitude and plenty of airspeed before attempting
any high-G maneuvers.
As discussed in section
12.11.8, it is fairly easy to get into a situation where you have a
nose-high pitch attitude, very little airspeed, and very little altitude.
In this situation, the usual stall-recognition and stall-recovery techniques
will do you no good whatsoever. You need to recover before the
airplane stalls, and you need to recover with zero loss of altitude.
Therefore it is a good idea to practice recovering from this situation.
The procedure is:
- Go up to a safe altitude.
- Set up for a power-off glide in the landing configuration.
- Gradually pull back on the yoke until you are a few knots above the
stall speed.
- Then pull back on the yoke quite a bit more. Observe that the airplane
rotates to a very high nose-up attitude and begins to climb.
- Before the airplane has climbed more than a few feet, and before
it stalls, push the nose back down to the attitude that corresponds to
level flight at a very low airspeed.
- At the same time, apply full power.
- Fly level until you regain airspeed, using the usual go-around procedures.
Practice this over and over, until you are confident that you can recover
from a pitch excursion with zero loss of altitude.
- 1
- ... unless you are inside a cloud, in which case you hope everybody
in that cloud is on an IFR clearance so that ATC can provide separation.
- 2
- You may have seen some books that refer to the ``four fundamentals''.
Here's how they get from three to four:
- They list straight-and-level as a separate item, whereas I consider
it the natural consequence of zero change in altitude, zero change in
airspeed, and zero turn.
- They treat climbs as different from descents.
- They treat left turns the same as right turns.
- They entirely disregard acceleration and deceleration, whereas
I consider airspeed control to be quite fundamental.
- 3
- If you can't find a suitable scratch or bug corpse on the windshield,
it may be instructive to make a mark, as discussed in section
11.5.2.
- 4
- The other possibility is a windshear from tailwind to headwind, which
is the opposite of what you normally encounter. This will give
you excess energy, which could be a problem, especially if the field is
short.
- 5
- These are flat plates the pop up from the top of each wing. The air
hits them broadside. They approximately double the airplane's coefficient
of parasite drag.
- 6
- ...unless you spend a lot of time on the back side of the power curve,
which is usually not practical.
- 7
- The physics works like this: Your kinetic energy relative to the new
air is greater than your kinetic energy relative to the old air. Your
airspeed relative to the ground has not changed, or may even have decreased
slightly, but that is irrelevant. The airplane doesn't care about the
ground. The local air is the only thing that matters.
- 8
- It is a little hard to explain why, in everyday flying, you would be
flying level with full flaps extended, but don't worry about that. This
maneuver (a) is a good training exercise, and (b) is an important part
of the FAA practical test.
- 9
- There is, after all, a physical limit to the amount of force any
finite-sized elevator can produce, and this typically explains why the forward
edge of the envelope is where it is.
- 10
- This works fine in a four-seat aircraft with two people aboard, or
a two-seater with one person aboard, but it may not be possible in a two-seater
with two people aboard, because of limits on the total weight.
- 11
- You can practice most elements of the stall-recovery maneuver without
actually stalling the plane. That is, starting from level flight a few
knots above the stalling speed, push the nose over, dive 50 feet or so
to gain airspeed, and then level off. Don't forget to apply power, reduce
drag, and maintain wings level. This sort of practice often helps students
overcome their fear of stalls, by building up their confidence in their
recovery procedures.
- 12
- Assuming a standard American engine that rotates clockwise as seen
from behind.
[Previous] [Contents] [Next]
[Comments or questions]
Copyright © 1996-2001 jsd